

Valid HTTPS for LAN-only services with acme-dns and pfSense
Some of my services only exist on the LAN, and I still wanted real Let's Encrypt certificates on them. A step-by-step guide to DNS-01 with acme-dns in Docker, a port forward in pfSense, and one acme.sh machine that issues every certificate and ships it to the servers.
Contents
- Why DNS-01 and why acme-dns
- How the pieces fit
- Step 1: DNS records at your provider
- Step 2: forward port 53 in pfSense
- Step 3: run acme-dns in Docker
- Check it from outside
- Step 4: register each name
- Step 5: issue certificates with acme.sh
- Step 6: send the certificates to the servers
- When it doesn't work
- What to keep safe
Some of the services on my network only exist on the LAN, and I still wanted valid HTTPS on them, with certificates from Let's Encrypt.
A certificate from a public CA is trusted out of the box by browsers, phones and command-line tools, which a self-signed certificate or a private CA can't match without installing something on every device. The usual way to get one from Let's Encrypt is the HTTP-01 challenge, and it needs port 80 open to the internet on every name you want a certificate for. For services that aren't meant to be reachable from outside, that defeats the point. So I set this up with the DNS-01 challenge and a small server called acme-dns: one acme-dns container answers the challenges, pfSense forwards DNS traffic to it, and a single machine running acme.sh issues every certificate and copies it to the servers that use it.
This post walks through the whole setup. All names and addresses below are examples, so swap in your own.
Why DNS-01 and why acme-dns #
With DNS-01, you prove you control a name by publishing a TXT record at _acme-challenge.<name>. Let's Encrypt looks it up in public DNS and, if the value matches, issues the certificate. The server that will use the certificate never has to be reachable. As a bonus, DNS-01 is the only challenge that can issue wildcard certificates.
The catch is that your ACME client has to change DNS records, automatically, every time a certificate is issued or renewed. Many DNS providers don't have an API, and the ones that do usually hand out keys that can edit the whole zone. A leaked key like that can take over your domain.
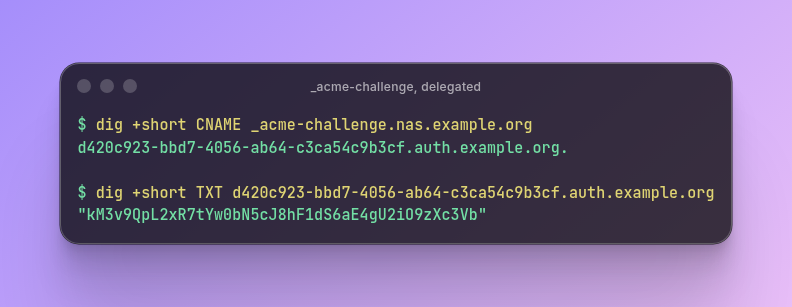
acme-dns fixes this. It's a tiny authoritative DNS server with an HTTP API that can only do one thing: update a TXT record on a random subdomain it owns, such as d420c923-bbd7-4056-ab64-c3ca54c9b3cf.auth.example.org. You point _acme-challenge.nas.example.org at that subdomain with a CNAME, once, and Let's Encrypt follows the CNAME during validation. If the acme-dns credentials ever leak, all someone can do is change one TXT record.
How the pieces fit #
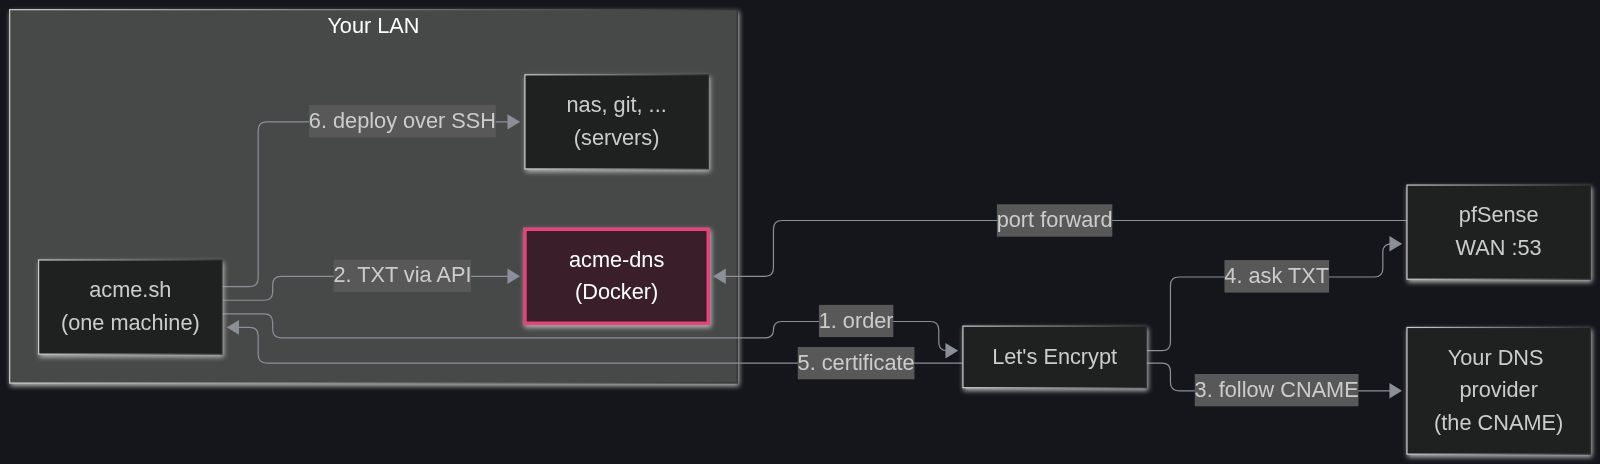
Who does what:
- acme-dns: answers DNS queries for
auth.example.organd its subdomains on port 53, and takes TXT updates through its API. It is not a certificate authority and doesn't issue anything. - pfSense: forwards port 53 from the WAN to the acme-dns container, so Let's Encrypt can reach it.
- acme.sh: runs on one machine on the LAN, asks Let's Encrypt for certificates, writes the challenge values into acme-dns through the API, then copies the finished certificates to each server.
- Let's Encrypt: queries public DNS, follows the CNAME to acme-dns and checks the TXT value.
The example values used throughout:
-
example.org: your domain. -
auth.example.org: the name of the acme-dns server. -
203.0.113.10: your public WAN address. -
192.168.10.53: the machine running the acme-dns container. -
192.168.10.20: the machine running acme.sh. -
nas.example.org,git.example.org: services on the LAN that need certificates.
The order matters a little. acme-dns gets its own API certificate through DNS, so public DNS and the port forward need to be ready before the container starts for real.
Step 1: DNS records at your provider #
In the zone for example.org, at whoever hosts your DNS today, add two records:
auth.example.org.  A   203.0.113.10
auth.example.org.  NS  auth.example.org.
The NS record hands the whole auth.example.org subzone to acme-dns. The A record tells the world where that server is. If your ISP gives you an IPv6 address and you want to use it, add an AAAA record too, and forward IPv6 in pfSense as well.
If your WAN address changes from time to time, these records have to follow it: you'd need dynamic DNS for auth.example.org and a matching update to the acme-dns config.
Step 2: forward port 53 in pfSense #
In pfSense, go to Firewall, NAT, Port Forward and add a rule:
- Interface: WAN
- Address Family: IPv4
- Protocol: TCP/UDP
- Destination: WAN address
- Destination port range: DNS (53)
- Redirect target IP: 192.168.10.53
- Redirect target port: DNS (53)
- Description: acme-dns (DNS-01 challenges)
- Filter rule association: Add associated filter rule
Save and apply. The associated rule is what actually lets the traffic in on the WAN.
A few things to watch here:
- Forward port 53 only. The acme-dns API stays inside the LAN and doesn't need any rule on the WAN.
- Forward it to one machine. A port forward points to a single address, and you only need one acme-dns for every name on the network.
- Opening 53 doesn't turn you into an open resolver. acme-dns only answers for its own zone and doesn't look up anything else for anyone.
- Don't geoblock it. Let's Encrypt validates from several places around the world at once, and it recommends against geoblocking the traffic it uses to validate. If you run pfBlockerNG with country blocks on the WAN, leave this rule out of them.
- If your ISP uses carrier-grade NAT or blocks inbound port 53, this setup can't work from home. Check that first.
One more pfSense setting makes life easier inside the LAN. Go to Services, DNS Resolver, Host Overrides and add auth in domain example.org pointing to 192.168.10.53. Machines on the LAN then reach acme-dns directly by name, and the API's certificate matches the name they use.
Step 3: run acme-dns in Docker #
On the acme-dns machine, create a folder with two subfolders, one for the config and one for the database:
mkdir -p ~/acme-dns/config ~/acme-dns/data
cd ~/acme-dns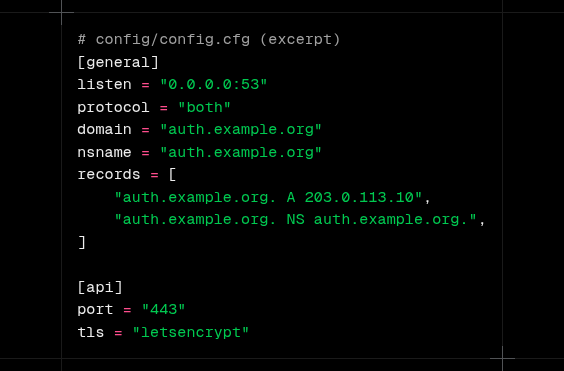
Then config/config.cfg:
[general]
listen = "0.0.0.0:53"
protocol = "both"
domain = "auth.example.org"
nsname = "auth.example.org"
nsadmin = "admin.example.org"
records = [
    "auth.example.org. A 203.0.113.10",
    "auth.example.org. NS auth.example.org.",
]
debug = false

[database]
engine = "sqlite"
connection = "/var/lib/acme-dns/acme-dns.db"

[api]
ip = "0.0.0.0"
disable_registration = false
port = "443"
tls = "letsencrypt"
acme_cache_dir = "/var/lib/acme-dns/api-certs"
notification_email = ""
corsorigins = ["*"]
use_header = false
header_name = "X-Forwarded-For"

[logconfig]
loglevel = "info"
logtype = "stdout"
logformat = "text"
The parts worth explaining:
-
listen: the project's template says127.0.0.1:53, which is fine for a plain install but useless inside a container.0.0.0.0:53listens on every interface of the container, and Docker decides what reaches it. -
domain,nsnameandrecords: the zone acme-dns is responsible for, and the same two records you created at your provider in step 1. -
nsadmin: an email address written with a dot instead of the@, as DNS zones do. It only shows up in the zone's SOA record. -
engine = "sqlite": version 2 of acme-dns renamed this fromsqlite3. Older guides still use the old name. -
tls = "letsencrypt": acme-dns gets a certificate for its own API from Let's Encrypt, using a DNS challenge against itself. That works even though the API is never exposed to the internet. While testing,letsencryptstagingavoids the rate limits. -
acme_cache_dir: where that API certificate is stored. The template uses a relative path, which would live inside the container and vanish when it's recreated, so it goes into the data folder here.
Now docker-compose.yml:
services:
  acmedns:
    image: joohoi/acme-dns:v2.0.2
    restart: unless-stopped
    ports:
      - "192.168.10.53:53:53/udp"
      - "192.168.10.53:53:53/tcp"
      - "192.168.10.53:443:443/tcp"
    volumes:
      - ./config:/etc/acme-dns:ro
      - ./data:/var/lib/acme-dns
Publishing the ports on the machine's LAN address, instead of on all addresses, avoids a common clash: on systems with systemd-resolved, a local DNS stub already holds port 53 on 127.0.0.53, and Docker can't bind 0.0.0.0:53 next to it. It also keeps the API from showing up on any other interface the machine has.
Start it and watch the log:
docker compose up -d
docker compose logs -f
The log should show acme-dns starting and, shortly after, the API certificate being obtained.
Check it from outside #
From any machine, ask a public resolver about the new zone:
dig +short NS auth.example.org @1.1.1.1
dig +short A auth.example.org @1.1.1.1
The first should return auth.example.org. and the second your WAN address. Then, from the LAN, check the API:
curl https://auth.example.org/healthA 200 response with no certificate error means DNS, the port forward, the host override and the API certificate all work.
Step 4: register each name #
Each name that needs a certificate gets its own registration in acme-dns. From the acme.sh machine:
curl -s -X POST https://auth.example.org/register \
  -H 'Content-Type: application/json' \
  -d '{"allowfrom": ["192.168.10.20/32"]}'
The answer looks like this:
{
  "username": "eabcdb41-d89f-4580-826f-3e62e9755ef2",
  "password": "pbAXVjlIOE01xbut7YnAbkhMQIkcwoHO0ek2j4Q0",
  "fulldomain": "d420c923-bbd7-4056-ab64-c3ca54c9b3cf.auth.example.org",
  "subdomain": "d420c923-bbd7-4056-ab64-c3ca54c9b3cf",
  "allowfrom": ["192.168.10.20/32"]
}
allowfrom limits updates for this registration to the acme.sh machine. Even with the username and password, a request from anywhere else is refused. If acme.sh runs on the same machine as the container, Docker may show the requests as coming from its own bridge address instead; in that case leave allowfrom out or use the bridge network.
Store the four values somewhere safe, then go back to your DNS provider and create the CNAME, using the fulldomain from the answer:
_acme-challenge.nas.example.org. CNAME d420c923-bbd7-4056-ab64-c3ca54c9b3cf.auth.example.org.Repeat for every name: git.example.org gets its own registration and its own CNAME. It's a bit more work than one shared registration, and it means a leaked credential only exposes one name. A wildcard and its base domain (*.example.org and example.org) use the same _acme-challenge.example.org record, so one registration covers both; acme-dns keeps two TXT values at once for exactly this case.
This is the only time you touch your DNS provider for a given name. Renewals happen through the API.
When every name is registered, you can set disable_registration = true in the config and restart the container, so nobody else on the LAN can create registrations. Turn it back on when you add a service.
Step 5: issue certificates with acme.sh #
On the acme.sh machine, install it:
curl https://get.acme.sh | sh -s email=you@example.orgThe installer also adds a daily cron job that renews certificates when they get close to expiring. acme.sh uses ZeroSSL as its default CA, so if you want Let's Encrypt, say so once:
acme.sh --set-default-ca --server letsencryptNow issue the certificate for nas.example.org, giving acme.sh the values from its registration:
export ACMEDNS_BASE_URL="https://auth.example.org"
export ACMEDNS_USERNAME="eabcdb41-d89f-4580-826f-3e62e9755ef2"
export ACMEDNS_PASSWORD="pbAXVjlIOE01xbut7YnAbkhMQIkcwoHO0ek2j4Q0"
export ACMEDNS_SUBDOMAIN="d420c923-bbd7-4056-ab64-c3ca54c9b3cf"

acme.sh --issue --dns dns_acmedns -d nas.example.org --staging
--staging uses Let's Encrypt's test environment, which has generous limits and issues certificates nobody trusts. Once it works, run the same command with --force instead of --staging to get the real one.
acme.sh saves those four values in the configuration for that certificate, so renewals don't need the variables again. For the next name, export the values from its own registration and issue again. If you skip the variables, acme.sh registers a new account by itself and stops to ask you to create the CNAME, which is fine on the first run but useless in a script.
Step 6: send the certificates to the servers #
With one machine issuing everything, the certificates still have to reach the servers that use them. acme.sh has deploy hooks for this, and the ssh hook copies files over SSH and runs a command on the other side:
export DEPLOY_SSH_USER="deploy"
export DEPLOY_SSH_SERVER="192.168.10.31"
export DEPLOY_SSH_KEYFILE="/etc/ssl/private/nas.example.org.key"
export DEPLOY_SSH_FULLCHAIN="/etc/ssl/certs/nas.example.org.fullchain.pem"
export DEPLOY_SSH_REMOTE_CMD="sudo systemctl reload nginx"

acme.sh --deploy -d nas.example.org --deploy-hook ssh
acme.sh remembers the hook and its settings, and runs it again after every renewal. For this to work unattended:
- The acme.sh machine needs an SSH key that logs into the server without a password.
- The
deployuser needs to write to those two files, and to run the reload command. A sudoers line that allows onlysystemctl reload nginxis enough. - Change the reload command to whatever the service needs: nginx, Caddy, a container restart.
Some devices can't take a certificate over SSH at all: appliances, NAS web panels, routers. acme.sh has specific deploy hooks for many of them, so check the list before writing your own.
When it doesn't work #
Most failures are in the DNS path. Check in this order:
-
dig +short NS auth.example.org @1.1.1.1returnsauth.example.org. -
dig +short A auth.example.org @1.1.1.1returns your current WAN address. -
dig +short CNAME _acme-challenge.nas.example.org @1.1.1.1returns the rightfulldomain. -
dig TXT d420c923-bbd7-4056-ab64-c3ca54c9b3cf.auth.example.org @1.1.1.1answers at all. Before any issuance the TXT may be empty, but the query shouldn't time out. -
docker compose logson the acme-dns machine shows the queries arriving and the API updates being accepted.
If step 1 or 2 fail, the problem is at your DNS provider. If 4 times out, it's the port forward, the firewall rule or the ISP. If the logs show updates being refused, look at allowfrom and the credentials.
Test from outside your network, too. A query that works from the LAN may be answered by pfSense's host override and never touch the public path that Let's Encrypt uses.
What to keep safe #
- The acme.sh machine holds every private key and every acme-dns credential. It's the most sensitive box in this setup, so treat it that way.
- Back up the acme-dns
datafolder. The database holds the registrations, and losing it means registering every name again and changing every CNAME. - Keep the API off the WAN. Nothing outside the LAN needs it.
After the first round of CNAMEs, there's nothing left to do by hand. acme.sh renews each certificate before it expires, acme-dns answers the challenge, and the deploy hook puts the new files in place and reloads the service.