

Vim without the mystery
Vim feels scary until one idea clicks: modes. A friendly, step-by-step guide to getting out, moving around, editing with verbs and text objects, search and replace, a small vimrc that doesn't break the defaults, and how to practice.
Vim has a reputation. The most famous joke about it is that nobody knows how to leave: you open a file by accident, the keyboard stops doing what keys normally do, and the only way out seems to be closing the terminal.
All of that confusion comes from one idea that nobody explains at the door. Once it clicks, Vim stops being a puzzle and starts feeling like a small language you speak to your text. This post goes from "how do I get out" to editing comfortably, one step at a time. Open a terminal, run vim practice.txt, and try things as you read. Nothing here can break.
First things first: the way out #
If you only remember one thing, make it this. Press Esc, then type one of these and hit Enter:
-
:q: quit. Vim refuses if you changed something and didn't save, which is a feature. -
:q!: quit and throw away your changes. -
:w: save. -
:wq: save and quit.:xandZZdo the same.
The colon opens a small command line at the bottom of the screen, and whatever you type there runs when you press Enter. If you ever feel lost, press Esc a couple of times. It always brings you back to where you started.
Why Vim works like this #
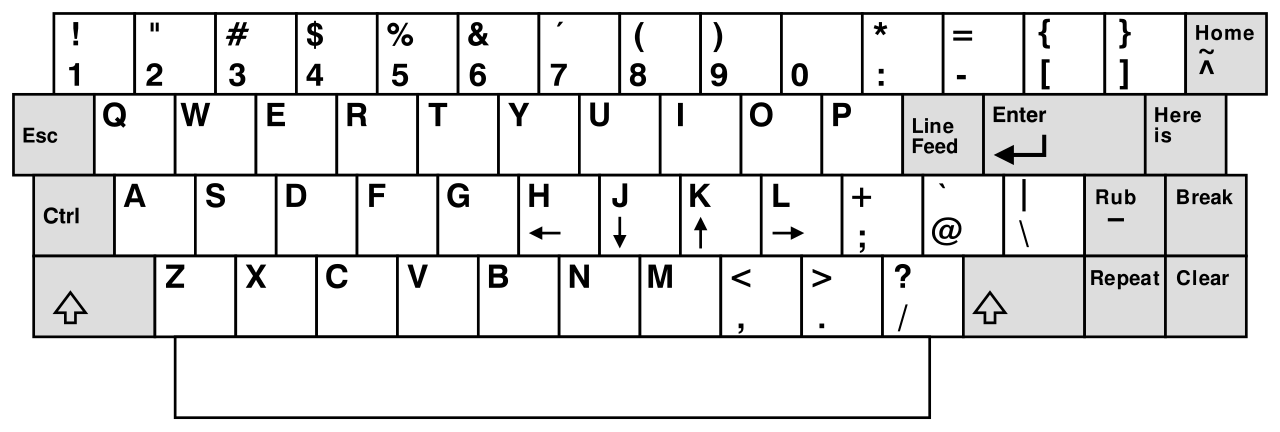
The story starts in 1976, at UC Berkeley. Bill Joy added a full-screen "visual" mode to ex, a line editor, and that mode became vi. He wrote it on a Lear Siegler ADM-3A terminal, and that keyboard explains a lot. It had no separate arrow keys: the arrows were printed on H, J, K and L. And Esc sat where Tab is on today's keyboards, one finger away. Moving with hjkl and pressing Esc all the time made perfect sense on that machine, and the habit stuck.
In 1988 Bram Moolenaar, a Dutch programmer, started writing a vi clone for the Amiga. He called it Vi IMitation. It went public in 1991, and around version 2.0, in 1993, the name became Vi IMproved. Bram looked after Vim for more than thirty years, until he died in 2023. A group of longtime contributors maintains it now, and Vim 9.2 came out in February 2026.
There's also Neovim, a fork started in 2014. Everything in this post works the same way in both.
The one idea: modes #
In most editors, the keyboard always types. Press d and a "d" shows up on the screen.
Vim has modes, and the keyboard means different things in each one:
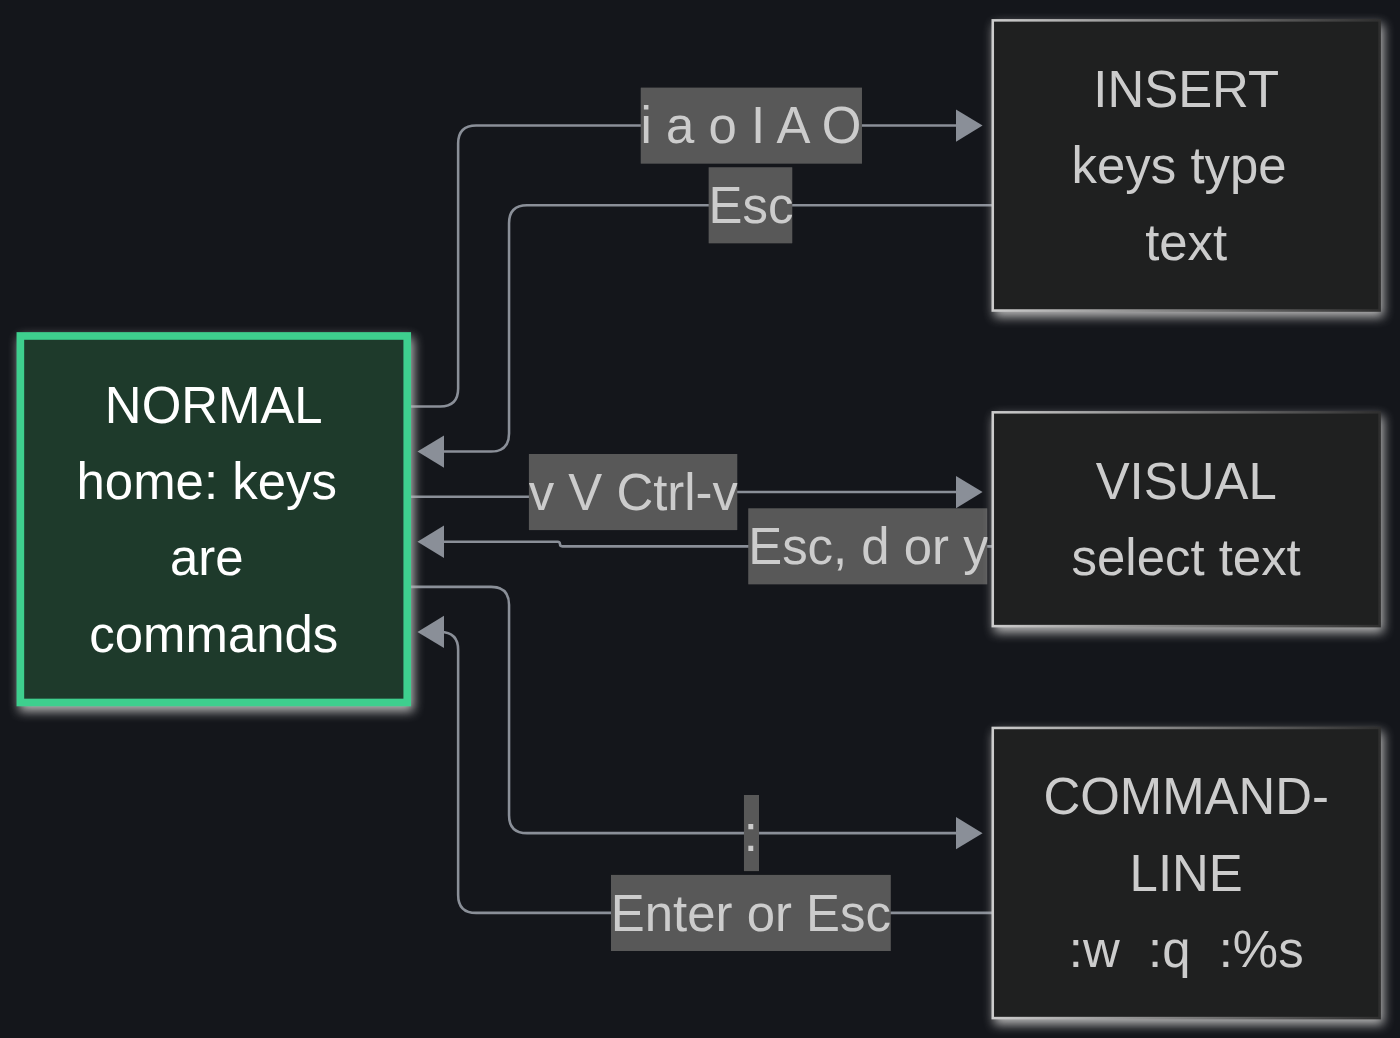
- Normal mode: where Vim starts, and where you spend most of your time. Keys are commands:
ddeletes,wjumps to the next word,uundoes. - Insert mode: the keyboard types, like in any other editor. The bottom of the screen says
-- INSERT --. - Visual mode: you select text, then act on the selection.
- Command-line mode: the
:you used to quit. It runs longer commands, like saving or search and replace.
The trick is to see Normal mode as home. You go into Insert mode to type something, then press Esc and come back. Editing in Vim is mostly moving around and changing things, and typing new text is a short trip. That's why the "typing" mode isn't the default.
Typing text #
From Normal mode, any of these takes you into Insert mode, each starting in a different spot:
-
i: insert before the cursor. -
a: insert after the cursor (think "append"). -
I: insert at the beginning of the line. -
A: insert at the end of the line. -
o: open a new line below and start typing there. -
O: open a new line above.
Type your text, press Esc, and you're home again. Try A on any line: it's the fastest way to add something at the end, no matter where the cursor is.
Moving around #
The arrow keys work, and there's no shame in using them at first. These are the moves worth learning next, because they save the most time:
-
hjkl: left, down, up, right.jlooks like an arrow pointing down, if that helps. -
w: jump to the start of the next word. -
b: jump back to the start of the previous word. -
e: jump to the end of the word. -
0: go to the start of the line. -
^: go to the first character that isn't a space. -
$: go to the end of the line. -
gg: go to the top of the file. -
G: go to the bottom of the file. -
42G: go to line 42.:42does the same. -
f(: jump forward to the next(on this line. Works with any character. -
%: jump between matching brackets. -
Ctrl-dandCtrl-u: scroll half a page down and up.
Most moves accept a number in front: 3w jumps three words, 5j goes down five lines.
The grammar: verb, then where #
This is the part where Vim starts to make sense. Commands are built like short sentences: a verb, then a place.
The verbs:
-
d: delete. -
c: change (delete, then drop you into Insert mode). -
y: yank, which is Vim's word for copy. -
>and<: indent and unindent.
Put any verb in front of any motion from the last section and they combine:
-
dw: delete to the next word. -
d$: delete to the end of the line. -
cw: change to the end of the word. -
y$: copy to the end of the line. -
dgg: delete everything up to the top of the file.
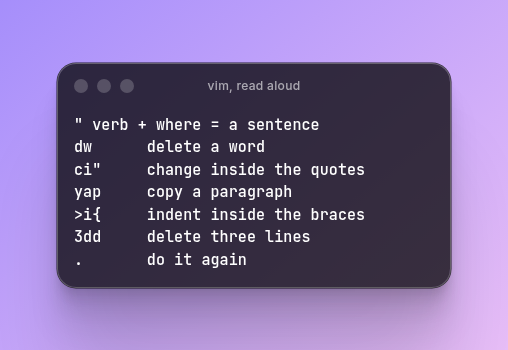
Type a verb twice and it acts on the whole line: dd deletes a line, yy copies it, cc changes it, >> indents it. A number multiplies: 3dd deletes three lines.
Then there are text objects, which are the real magic. Instead of "from here to there", they mean "this thing I'm in", so the cursor can be anywhere inside it:
-
iw: the word under the cursor ("inner word"). -
i": the text inside quotes. -
i(: the text inside parentheses. -
ip: the paragraph. -
a",a(,ap: the same, but including the quotes, parentheses or blank line around it.
So ciw reads "change inner word", di( is "delete inside parentheses", and yap is "yank a paragraph". Picture this line, with the cursor somewhere on the word print:
print("hello")Type ci", then world, then Esc. Vim finds the next quoted text on the line, empties it, lets you type, and you get print("world"). Once you know a handful of verbs and objects, you can combine them freely, without memorizing each combination.
Two more keys complete the set:
-
.: repeat the last change. Changed a word withciw? Move to another word and press.. -
u: undo.Ctrl-rredoes.
Copy, cut and paste #
-
yy: copy the line. -
p: paste after the cursor (or below, for whole lines). -
P: paste before the cursor (or above). -
x: delete the character under the cursor.
Anything you delete with d, c or x also goes to the same place as a copy, so deleting works like cutting: dd on one line, move somewhere else, p, and you've moved the line. ddp swaps a line with the one below.
Vim keeps its own clipboard, separate from your system's. To reach the system clipboard, put "+ in front: "+yy copies the line to it, "+p pastes from it. This only works if your Vim was built with clipboard support. Check with vim --version | grep clipboard: +clipboard means yes, -clipboard means no. On Debian and Ubuntu, installing vim-gtk3 gives you a Vim that has it, even in the terminal.
Search and replace #
-
/word, then Enter: search forward for "word". -
?word: search backward. -
nandN: jump to the next and previous match. -
*: search for the word under the cursor. -
:noh: clear the search highlight.
Search and replace happens on the command line:
:%s/old/new/g% means the whole file, s is substitute, and g replaces every match on each line, not only the first. Add a c at the end (:%s/old/new/gc) and Vim asks before each replacement, which is a good habit while you're learning.
Selecting text #
-
v: select character by character. -
V: select whole lines. -
Ctrl-v: select a rectangle, a block of columns.
Move to grow the selection, then use a verb: d deletes it, y copies it, > indents it, c changes it.
Block selection has a trick worth showing a friend. Put the cursor on the first of a few lines, press Ctrl-v, move down with j to cover them, press I, type -, and press Esc. The text appears at the start of every selected line:
- milk
- eggs
- bread
Files and windows #
-
:e notes.txt: open another file. -
:w copy.txt: save under a new name. -
:spand:vsp: split the window horizontally and vertically. -
Ctrl-w w: jump to the next window. -
Ctrl-w h,Ctrl-w j,Ctrl-w k,Ctrl-w l: jump to the window on the left, below, above or on the right. -
:lsand:b 2: list open files and switch to number 2.
A small vimrc #
Vim reads your settings from ~/.vimrc. There's one catch that trips up almost everyone: if you have no vimrc, Vim loads a file called defaults.vim with sensible settings (syntax colors, search as you type, a few lines of margin when scrolling). The moment you create your own vimrc, that file stops loading, and Vim suddenly looks worse. The fix is two lines at the top, straight from Vim's own help.
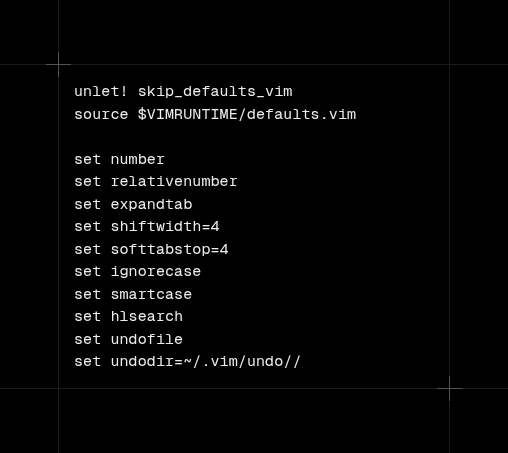
Here's a small starting point:
unlet! skip_defaults_vim
source $VIMRUNTIME/defaults.vim

set number
set relativenumber
set expandtab
set shiftwidth=4
set softtabstop=4
set ignorecase
set smartcase
set hlsearch
set undofile
set undodir=~/.vim/undo//
What each part does:
- The first two lines bring
defaults.vimback. -
numberandrelativenumber: show the current line's number and, on the others, how far away they are. With that,5jord3kstop being guesswork. -
expandtab,shiftwidth=4andsofttabstop=4: indent with four spaces instead of tab characters. Change the numbers to taste. -
ignorecaseandsmartcase: searches ignore case, unless you type a capital letter. -
hlsearch: highlight every match of the last search. -
undofileandundodir: keep your undo history after closing the file, soustill works tomorrow. Create the folder first withmkdir -p ~/.vim/undo.
Add things one at a time, when you miss them. A vimrc copied from someone else is full of settings you won't know you have.
Where to practice #
Vim ships with a tutorial. Type vimtutor in the terminal and it opens a practice file with lessons you do inside Vim itself. It takes about 30 minutes, and it's the quickest way to get the basic keys into your fingers. Neovim has its own version, opened with :Tutor.
Inside Vim, :help covers everything, and it searches by topic: :help text-objects, :help iw, :help :s. The help opens inside Vim, so reading it is practice as well.
These keys also show up in more places than you'd expect. less and man pages move with j and k and search with /, many code editors have a Vim mode, and browsers have extensions that add one. Learning them pays off outside Vim too.
Don't try to learn everything at once. Pick two or three new commands a week, use them until your fingers know them, then pick a few more. After a while you'll notice you stopped thinking about the keys and started thinking in sentences: change this word, delete this paragraph, copy these three lines.